Subsections of CloudCheckr AWS Built-in Automation
Overview
This AWS Built-in solution deploys CloudCheckr integrations for AWS Organizations on the AWS Cloud. It’s designed for customers and partners looking to provide Financial Operations (FinOps) management and governance across multiple AWS accounts.
Deploying this AWS Built-in solution does not guarantee an organization’s compliance with any specific laws, certifications, policies, or other regulations.
Solution overview
The CloudCheckr integrations for AWS Organizations solution is designed to automate the process of configuring and credentialing CloudCheckr for customers/partners after purchasing it from AWS Marketplace. This automation includes building an AWS Identity and Access Management (IAM) role, generating and credentialing an AWS account in CloudCheckr, and setting up required resources such as Amazon S3 buckets, Lambda functions, and AWS CloudFormation stacks.
Using AWS Built-in, CloudCheckr customers can monitor their environment for CloudWatch events automatically and efficiently, as well as access other valuable cloud management features within CloudCheckr.
AWS Marketplace listing
Visit AWS Marketplace to view the CloudCheckr listing. This listing provides detailed information about the product, pricing, and support.
By taking advantage of CloudCheckr integrations for AWS Organizations, users can enhance their AWS experience, ensuring a more secure, efficient, and optimized cloud environment.
Next: Terminologies
Terminologies
- AWS Built-in: An AWS Specialization that validates partner solutions that have automated their solution integrations with relevant AWS foundational services for identity, management, security, and operations.
- AWS Built-in modules: The GitHub repositories based on AWS Security Reference Architecture (AWS SRA). Modules provide templates for enabling AWS foundational services such as AWS CloudTrail, Amazon GuardDuty, AWS Security Hub, etc.
- AWS Built-in projects: The GitHub repositories built by partners in partnership with AWS. While building these projects, partners use the provided AWS Built-in modules to enable AWS services as needed before creating partner-specific assets. The solution contains (1) Infrastructure as Code (IaC) templates to automate enablement of both AWS and partner services, and (2) wrappers for most common formats such as CfCT manifest, AWS Service Catalog baselines, and more, so customers can pick and choose from the available services.
- CloudCheckr: A cloud management platform that provides a wide range of cloud management features such as cost optimization, security and compliance monitoring, automation, and reporting.
- IAM role: An IAM entity in AWS that defines a set of permissions for making AWS service requests. IAM roles are not associated with a specific user or group. Instead, trusted entities assume roles, such as IAM users, applications, or AWS services like Amazon EC2.
- CloudFormation stacks: A collection of AWS resources that you can manage as a single unit. You create, update, and delete a collection of resources by creating, updating, and deleting stacks.
Next: Costs and licenses
Cost and licenses
Become familiar with cost implications and licensing requirements before deploying the AWS Built-in solution for CloudCheckr.
CloudCheckr cost and licenses
The cost associated with the CloudCheckr solution is available on the AWS Marketplace listing. The pricing model is subscription-based.
AWS service costs
The AWS Built-in solution for CloudCheckr uses several AWS services, including IAM, CloudFormation, Amazon S3, and AWS Lambda. The costs for these services are based on usage. For detailed and up-to-date information, refer to the AWS pricing page for each service.
AWS Built-in cost and licenses
Using AWS Built-in doesn’t incur additional charges or require a separate license. The license is provided as part of the AWS solution to help automate the configuration and credentialing process. For details, refer to AWS Built-in license.
Note: Conduct a thorough cost analysis and understand the licensing requirements to avoid any unexpected expenses and ensure compliance with all licensing terms.
Next: Architecture
Architecture
Deploying this AWS Built-in solution with default parameters builds the following architecture:
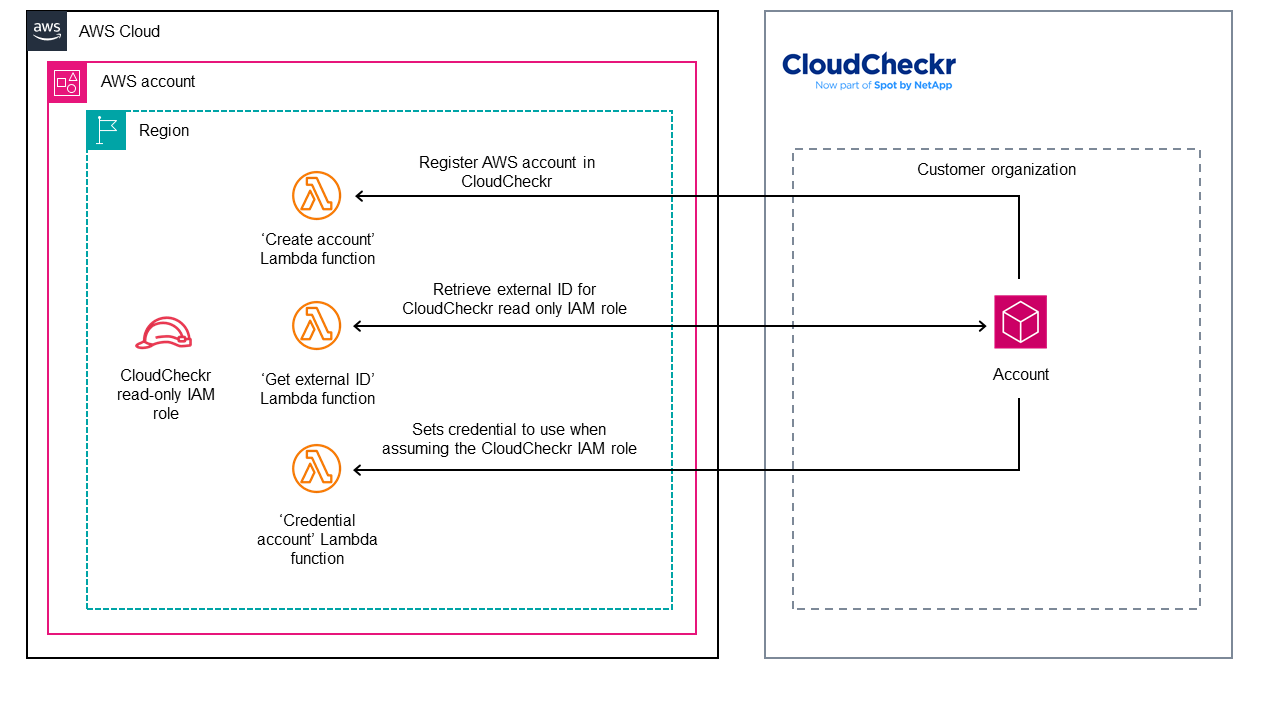
As shown in the diagram, the solution sets up the following:
- In every account where the AWS CloudFormation template is deployed:
- AWS Identity and Access Management (IAM) role with read permissions to various AWS services required by CloudCheckr.
- AWS Lambda functions for creating and credentialing AWS accounts in CloudCheckr.
- Amazon Simple Storage Service (Amazon S3) staging bucket for the CloudCheckr AWS Built-in solution resources.
Using this architecture, CloudCheckr customers can monitor their environment for Amazon CloudWatch events automatically and efficiently. They can also access other valuable cloud management features within CloudCheckr.
Next: Deployment options
Deployment options
This AWS Built-in solution provides various deployment options to cater to different organizational needs and requirements. Choose the one that fits your environment and infrastructure setup.
Features include
- Automated configuration and setup.
- Seamless integration with existing AWS services.
- Comprehensive monitoring and management capabilities.
The following deployment options offer flexibility and control in deploying the solution across various environments.
Next: Predeployment steps
Predeployment options
Before deploying this AWS Built-in solution, complete the following steps:
- Subscribe to the CloudCheckr - Govern and Optimize AWS at Scale AWS Marketplace listing.
- In your AWS account, confirm that you have an IAM role to run the AWS Built-in solution, the necessary permissions to create and manage CloudFormation stacks, and access to the required services such as S3 and Lambda.
- Purchase CloudCheckr on AWS Marketplace. For private pricing options, reach to the sales team at CloudCheckr.
- After purchasing CloudCheckr, an account is created, a user is automatically generated, and an email is sent to you with login instructions.
- Using the activation link, log in to CloudCheckr.
- Do the following steps to create an API key and secret within CloudCheckr:
- Click the three vertical dots in the top right corner.
- Choose Access Management > API Management.
- Choose Clients and click +NEW.
- Name your API client and set the client role to Full administrator.
- Save the new client.
- Click +New to generate an access key, provide a name, and choose Create.
- Copy the API secret.
- Run an AWS Cost and Usage Report on your S3 bucket in your AWS account. If you don’t have a report, follow the steps in Setting up an Amazon S3 bucket for Cost and Usage Reports.
- Review the CloudCheckr additional resources documentation and keep it handy while you navigate this guide.
Next: Deployment steps
Deployment steps
Launch the CloudFormation template in the AWS Organizations management account
-
Download the CloudFormation template: https://github.com/aws-ia/cfn-abi-spotbynetapp-cloudcheckr/blob/main/templates/CCBuiltIn.yaml
-
Launch the CloudFormation template in your AWS Control Tower home Region.
- Stack name:
template-cfn-abi-spotbynetapp-cloudcheckr-enable-integrations
- List parameters:
- pAPIKey: The API ID created in the CloudCheckr environment.
- pAPISecret: The secret associated with the APIKey.
- pEnvironment: The environment associated with your CloudCheckr Instance (US, EU, AU, GOV)
- pCustomerNumber: Found in the URL when logged into CloudCheckr, for example https://app-us.cloudcheckr.com/customers/1234567. In this example, the customer number is 1234567.
- pCurBucketName: Name of the S3 bucket for CUR data (if master payer account).
- pCloudTrailBucketName: Name of the S3 bucket for CloudTrail logs.
- pABIStagingS3Key: The staging S3 key for AWS Built-in.
- pABISourceS3BucketName: The source S3 bucket name for AWS Built-in.
- pABIS3BucketRegion: The Region of the S3 bucket for AWS Built-in.
-
Choose both Capabilities and then Submit to launch the stack.
- [] I acknowledge that AWS CloudFormation might create IAM resources with custom names.
- [] I acknowledge that AWS CloudFormation might require the following capability: CAPABILITY_AUTO_EXPAND.
Wait for the CloudFormation status to change to CREATE_COMPLETE state.
If you’re using this solution in an AWS organization that doesn’t use AWS Control Tower, you need to create IAM roles to Set up basic permissions for stack set operations so that this ABI solution can be deployed to all member accounts in the AWS Organizations or to specific accounts or OUs you select.
1. You need to create an IAM role (AWSCloudFormationStackSetAdministrationRole) in your management account to establish a trusted relationship between the account you're administering the stack set from and the account you're deploying stack instances to. The CloudFormation template to create this role is [available here](https://docs.aws.amazon.com/AWSCloudFormation/latest/UserGuide/stacksets-prereqs-self-managed.html#stacksets-prereqs-accountsetup).

2. You need to create an IAM execution role (AWSCloudFormationStackSetExecutionRole) for AWS CloudFormation to deploy the StackSets across all member accounts with in the organization. You can use [this CloudFormation template](https://s3.amazonaws.com/cloudformation-stackset-sample-templates-us-east-1/AWSCloudFormationStackSetExecutionRole.yml) and deploy the stack acoss the organization using instructions from [Create a stack set with service-managed permissions](https://docs.aws.amazon.com/AWSCloudFormation/latest/UserGuide/stacksets-getting-started-create.html#stacksets-orgs-associate-stackset-with-org)

3. From your Management Account create your AWS CloudFormation StackSets and chose `Self-service permissions` under Permission model and use `AWSCloudFormationStackSetAdministrationRole` for the IAM admin role name and  `AWSCloudFormationStackSetExecutionRole` for the IAM execution role name and then you can select the CloudFormation template from `https://github.com/aws-ia/cfn-abi-spotbynetapp-cloudcheckr/blob/main/templates/CCBuiltIn.yaml`.
[AWS CloudFormation StackSets Self-service permissions](/images/stack-set-admin.png)
Launch using Customizations for Control Tower (CfCT)
Customizations for AWS Control Tower combines AWS Control Tower and other highly available, trusted AWS services to help customers set up a secure, multiaccount AWS environment according to AWS best practices. You can add customizations to your AWS Control Tower landing zone using an AWS CloudFormation template and service control policies (SCPs). You can deploy the custom template and policies to individual accounts and organizational units (OUs) within your organization.
CfCT also integrates with AWS Control Tower lifecycle events to hlep ensure that resource deployments stay in sync with your landing zone. For example, when you create a new account using AWS Control Tower account factory, CfCT deploys all of the resources that are attached to the account.
The templates provided by this ABI package are deployable through CfCT.
Prerequisites
The CfCT solution can’t launch resources in the management account by default. You need select pCreateAWSControlTowerExecutionRole : true to allow the stack to create the role or must manually create a role in that account that has necessary permissions.
How it works
To deploy this sample partner integration page using CfCT, add the following blurb to the manifest.yaml file from your CfCT solution and update the account/ou names as needed.
resources:
  - name: deploy-cloudcheckr-init-stack
    resource_file: https://aws-abi.s3.us-east-1.amazonaws.com/cfn-abi-spotbynetapp-cloudcheckr/templates/CCBuiltIn.yaml
    deploy_method: stack_set
    parameters:
      - parameter_key: pAPIKey #The API ID created in the CloudCheckr environment.
        parameter_value: $[cloudcheckr/api_key]
      - parameter_key: pAPISecret #The API Secret created in the CloudCheckr environment.
        parameter_value: $[cloudcheckr/api_secret]
      - parameter_key: pEnvironment #The environment associated with your CloudCheckr Instance (US, EU, AU, GOV)
        parameter_value: $[cloudcheckr/api_secret]
      - parameter_key: pABISourceS3BucketName #The source S3 bucket name for ABI.
        parameter_value: aws-abi
      - parameter_key: pABIStagingS3Key #The staging S3 key for ABI.
        parameter_value: cfn-abi-spotbynetapp-cloudcheckr
      - parameter_key: pCloudTrailBucketName #Name of the S3 bucket of the organizational CloudTrail.
        parameter_value: [aws-controltower-logs-[AWS-LOG-ACCOUNT-ID]-[AWS-CONTROL-TOWER-HOME-REGION]
      - parameter_key: pCurBucketName #Name of the S3 bucket for CUR data (If master payer account).
        parameter_value: [[CUR-S3-BUCKET-NAME]]
      - parameter_key: pCustomerNumber #Found in the URL when logged into CloudCheckr. Example: https://app-us.cloudcheckr.com/customers/1234567 (The number after /customers/  in this case the customer number would be 1234567).
        parameter_value: [[CLOUDCHECKR-CUSTOMER-NUMBER]]
    regions:
      - us-east-1 # Update as needed
    deployment_targets:
      organizational_units: #Update as needed
        - OUName1
        - OUName2
Next: Postdeployment options
Postdeployment Options
Verifying the solution functionality
After deploying the AWS Built-in solution, do the following steps to verify its functionality:
- Log in to the AWS Management Console and navigate to the CloudFormation service console.
Wait for the CloudFormation stack to finish deploying. You can check the status of the deployment either via the console or by running the following command:
aws cloudformation describe-stacks --stack-name <YOUR_STACK_NAME>
The stack status is returned in the output. Wait until the status is CREATE_COMPLETE before proceeding to the next step. When the stack finishes deploying, you can access the created resources via the AWS Management Console or AWS Command Line Interface (AWS CLI).
After the deployment completes, you will see the root stack and nested stacks in the AWS Control Tower management account with status CREATE_COMPLETE.
From the stack details, check the Resources tab to confirm that resources were created and configured as expected.
- Log in to the CloudCheckr account dashboard and confirm that the AWS account has been credentialed and is pulling in the expected data from AWS.
Next: Test the deployment
Test the deployment
Verify the AWS services
Log in to the AWS Management Console and navigate to the services that were configured by the AWS Built-in solution. Check if the resources were created and configured as expected.
Confirm the CloudChecker dashboard
Log in to your CloudCheckr account and check if the AWS account has been credentialed and if the expected data is being pulled in.
Test partner capabilities
Verify the partner capabilities and features that were set up during deployment, for example, generating reports and setting up alerts.
Next: Additonal resources
Additional resources
Next: Troubleshooting
Troubleshooting
For troubleshooting issues with CloudCheckr, submit a ticket on the CloudCheckr support portal.
For troubleshooting common ABI issues, refer to the AWS Built-in Reference Guide and Troubleshooting CloudFormation.
Next: Feedback
Feedback
To submit feature ideas and report bugs, use the Issues section of the GitHub repository. To submit code, refer to the AWS Built-in Reference Guide. To submit documentation feedback, use the following GitHub links:
Next: Notices
Notices
This document is provided for informational purposes only. It represents current AWS product offerings and practices as of the date of issue of this document, which are subject to change without notice. Customers are responsible for making their own independent assessment of the information in this document and any use of AWS products or services, each of which is provided “as is” without warranty of any kind, whether expressed or implied. This document does not create any warranties, representations, contractual commitments, conditions, or assurances from AWS, its affiliates, suppliers, or licensors. The responsibilities and liabilities of AWS to its customers are controlled by AWS agreements, and this document is not part of, nor does it modify, any agreement between AWS and its customers.
The software included with this paper is licensed under the Apache License, version 2.0 (the “License”). You may not use this file except in compliance with the License. A copy of the License is located at http://aws.amazon.com/apache2.0/ or in the accompanying “license” file. This code is distributed on an “as is” basis, without warranties or conditions of any kind, either expressed or implied. Refer to the License for specific language governing permissions and limitations.
Cleanup instructions
Cleanup instructions
To remove all resources created by the AWS Built-in solution and avoid unexpected costs, follow these instructions. The cleanup process involves deleting the CloudFormation stack and all associated resources.
- Open the AWS CloudFormation console.
- Locate the stack created by the AWS Built-in solution.
- Choose Delete, and confirm the deletion.
CloudFormation automatically deletes all related resources.
Deleting additional resources
If you created additional resources outside of the CloudFormation stack, manually delete those resources. Additional resources typically include S3 buckets, IAM roles, and Lambda functions.
Deleting S3 buckets
- Navigate to the AWS S3 console.
- Locate the buckets created by the AWS Built-in solution and delete them.
Deleting IAM roles
- Navigate to AWS IAM console.
- Locate the roles created by the AWS Built-in solution and delete them.
Deleting Lambda functions
- Navigate to the AWS Lambda console.
- Locate the Lambda functions created by the AWS Built-in solution and delete them.
Deleting Previous ARN in CloudCheckr
- Navigate to the [CloudCheckr Account Management Console].
- Edit the credentialing field of the account and select “Delete” to remove the arn from the preexisting account.
Verifying resource deletions
In each service console, verify that all AWS Built-in resources are removed. If any resources remain, they may continue to incur costs.
Note: Avoid accidentally deleting important resources. Be sure that you delete only resources related to the AWS Built-in solution.
FAQs
How can I contribute to this repository?
The repository is shared under Apache license version 2.0 (the “License”). For issues and improvement suggestions, submit a GitHub issue. If you want to build and contribute a fix or enhancement, submit a GitHub pull request.
All pull requests are validated by AWS before being merged.