How to build an ABI project
The below example refers to steps followed to create the sample ABI project in this repository. While building your project, update the steps below as per your project needs.
-
Once you have access to the repository, fork the repository. Example below to create a fork from CLI.
gh auth login
gh repo fork https://github.com/aws-ia/cfn-abi-aws-reference-guide.git
Note: If you are working on a repository created for you, replace cfn-abi-aws-reference-guide.gitwith theyour-repository-name.git. -
Add the required ABI Modules as submodules to your repository (The securityhub repo is used as a submodule in the below example.).
mkdir submodules
cd submodules
git submodule add https://github.com/aws-samples/aws-security-reference-architecture-examples.git
# SKIP below step, if you are working on `your-repository-name.git`. This will update the submodules recursively for an existing repository.
git submodule update --init --recursive
Check here for List of available ABI Modules.
-
Build and update the code as per your project needs. Follow the structure explained in the Project Structure section to organize your code. Below is an example of the directory structure for the sample ABI project in this repository:
.
├── CODEOWNERS
├── CODE_OF_CONDUCT.md
├── LICENSE
├── NOTICE.txt
├── README.md
├── VERSION
├── guide
│   ├── assets
│   ├── config
│   ├── content
│   │   ├── _index.md
│   │   │   ...
│   │   │   ...
│   │   └── overview.md
│   │   ...
│   ├── resources
│   └── static
├── images
│   └── abi-architecture.png
├── lambda_functions
│   └── source
│       └── enable_integrations
│           ├── cfnresponse.py
│           ├── copy_zips.py
│           ├── enable_integration.py
│           └── requirements.txt
├── scripts
│   ├── cleanup_config.json
│   └── cleanup_config.py
├── submodules
│   └── aws-security-reference-architecture-examples
│       ├── AWS-SRA-KEY-INFO.md
│       ├── CHANGELOG.md
│       ├── LICENSE
│       ├── README.md
│       ├── aws_sra_examples
│       │   ├── docs
│       │   ├── easy_setup
│       │   ├── modules
│       │   │   ├── cloudtrail-org-module
│       │   │   ├── guardduty-org-module
│       │   │   └── securityhub-org-module
│       │   ├── quick_setup
│       │   ├── solutions
│       │   └── utils
│       └── pyproject.toml
└── templates
    ├── abi-enable-partner1-securityhub-integration.yaml
    └── enable_integrations
        └── partner1-enable-integrations.yaml
Note: There is no need to package your lambda source. Taskcat will take care of it and upload it in the path of lambda_functions/packages/<directory-name/lambda.zip>. Please make references to your code as needed.Note: If you are using your-own-repository, files in the above structure will vary slightly. However, the directory structure remains same. -
Run static tests locally.
Execute the following tests locally in your environment, the same set of tests are executed as part of the pipeline validations done with these tests:
-
cfn-lint tests:
-
- Install cfn-lint
pip3 install cfn-lint-
- Run cfn-lint
find templates -name *.yaml -o -name *.yml -o -name *.json | xargs cfn-lint-
taskcat lint:
-
- Install taskcat
pip3 install taskcat-
- Update the .taskcat.yaml in the root of the project as needed. Refer to example in next step or the taskcat documentation for additional information.
-
- Run taskcat
taskcat lint-
cfn_nag tests:
-
- Follow instructions in the cfn_nag documentation to install cfn_nag.
-
cfn-nag tests and add exceptions if needed Refer to instruction in the cfn-nag documentation to apply per-resource rule suppression. All suppressed rules should have a valid justification. Add detailed information under
reason:in theMetadatasection of the template to avoid delays in the review process.
-
-
Run functional tests locally
- automated-security-helper (ASH) tests (this performs
cfn_nagas well)
## Executing ash tool

$ git clone https://github.com/aws-samples/automated-security-helper.git /tmp/ash

# Set the repo path in your shell for easier access
$ export PATH=$PATH:/tmp/ash

$ ash --source-dir .
$ cat aggregated_results.txt
Note: ASH tool is not part of the automated pipeline yet. If you are seeing this note, please include the output of the ASH tool file to your PR. - Run
taskcattests to deploy the templates- Update the .taskcat.yaml in the root of the project. Refer to taskcat documentation for additional information.
- Update the default .taskcat.yaml file to closest to the below example:
project:
name: cfn-abi-aws-reference-guide # Change this to your project name
owner: aws-built-in-team@amazon.com # Change to the owner
package_lambda: true # Use this if you have lambda code in the repos
shorten_stack_name: true # Recommended to use smaller stack names
s3_regional_buckets: false # Not required if CopyZips are used. Refer to any ABI module for examples.
regions:
- us-east-1

tests:
launch-partner-solution:
    regions:
    - us-east-1  # Control Tower Home region for Pilot
    template: abi-enable-partner1-securityhub-integration.yaml
    parameters:
    pSRASourceS3BucketName: $[taskcat_autobucket]
    pSRASourceS3BucketNamePrefix: $[taskcat_project_name]
    pSRAS3BucketRegion: us-east-1  # Bucket region. Keep it to us-east-1 as all the resources are deployed in the region.
    # ApiKey: $[taskcat_ssm_/path/to/ssm/parameter], update `taskcat_ssm_/path/to/ssm/parameter` as needed (^^).
(^^) WARNING: Do not include secrets like API Keys and Passwords in the parameters section of .taskcat.ymlfile. Refer to PSUEDO_PARAMETERS. Work with your AWS contact to securely make them available in the test environments. - automated-security-helper (ASH) tests (this performs
-
On successful completion of both static and functional tests in your local environment, publish the Pull Request(PR).
git add <file-name> git commit -m <commit description> git push -
Create a Pull Request from your fork.
PS: Wait until both internal and static tests complete, as shown below.
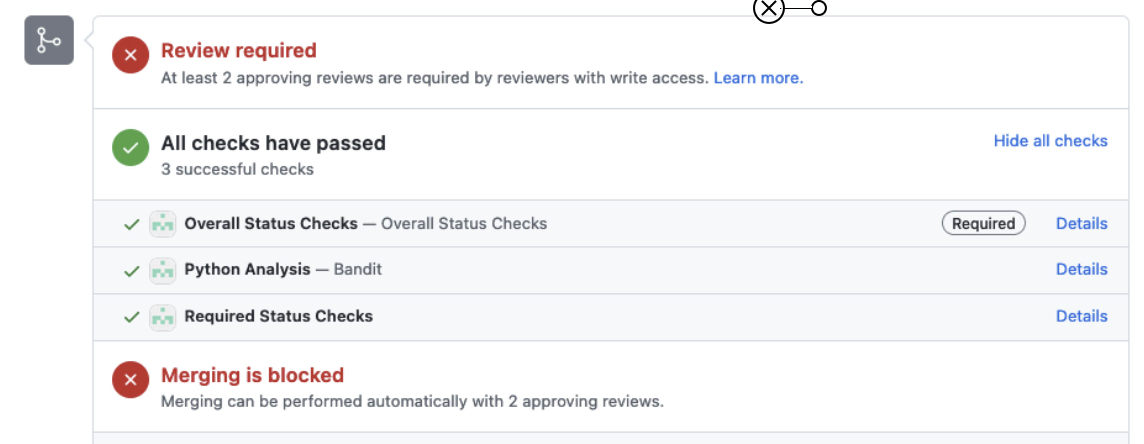
NOTE: In case of test failure, choose Details to collect additional information -
Work with AWS PSA(^) to trigger functional tests. This can be done by adding
/do-e2e-testsin the comments of the PR.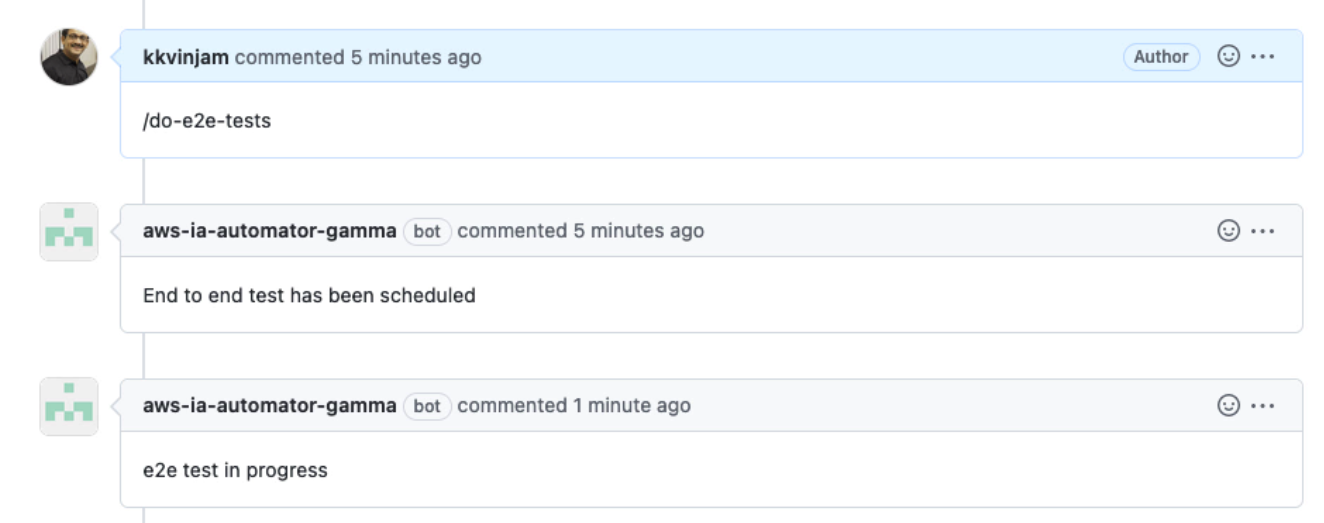
-
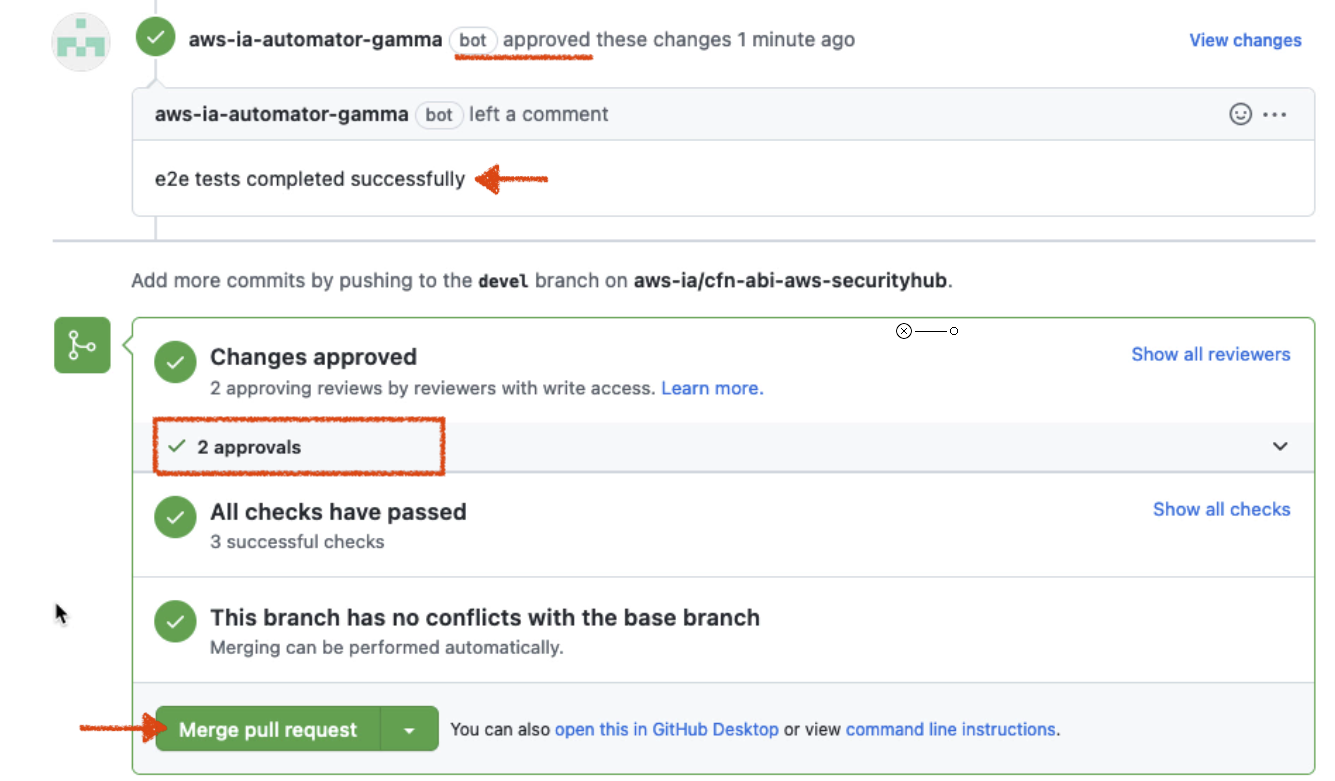
On successful completion of functional tests, the bot will add an approval. If the functional test fails, you will see an error, and you need to work with AWS PSA to get additional information on the failure.
E2E tests have completed successfully, however I am unable to provide an approval, as I opened this pr. You will need an additional human to review. -
A second approval needs to be given by an AWS personal. Once you have 2 approvals, work with AWS PSA(^) to Merge the pull request.
NOTE: Always sync your fork to get the latest code and build your solution on top of it.
(^) with write permissions to the repository