Subsections of AWS Built-in
AWS Built-in Overview
AWS Built-in (ABI) is a validated program awarded to ISV Partners to help customers deploy third-party software integrated with AWS native services. Customers prefer to buy a turnkey solution versus installing, securing, and configuring AWS native services themselves in order to realize the full benefits of third-party party software. Partner owned Built-in offerings provide deployment packages where partner solutions are integrated with AWS services via IaC. This reduces the time customers spend from weeks to hours and helps increase customer efficiency by optimizing the time to deploy new initiatives.
AWS built-in partner solutions install, configure, and integrate with key foundational AWS services using a well-architected Modular Code Repository (MCR) in an automated deployment package validated by AWS experts, increasing time to value. This automated integration is independently verified by AWS and saves hours, days, or even weeks of vendor integration testing.
By streamlining the integration process, we empower customers to fully harness the benefits of foundational AWS native services while taking advantage of the rich functionality and capabilities of third-party solutions. Our objective is to facilitate a unified and cohesive experience for customers, eliminating the complexities associated with combining different software and data sources.
For example, when a customer subscribes to an ISV partner product, they must follow a series of steps in order to transition from the subscription phase to a fully functional phase. These steps include a combination of manual and IaC steps. Enabling services like Amazon GuardDuty, AWS Security Hub, Amazon Inspector, and AWS CloudTrail before performing additional steps like adding AWS accounts, integrating with CloudTrail events and more on partner SaaS product.
Terminologies
- ABI : AWS Built-in (ABI) as explained above.
- ABI Modules : The GitHub repositories based of AWS Security Reference Architecture (AWS SRA), which provide templates for enabling AWS foundational services like CloudTrail, GuardDuty, and SecurityHub.
- ABI Project : The GitHub repositories built by Partners in partnership with AWS. While building these projects, partners leverage ABI Modules provided to enable AWS services as needed before creating partner specific assets. The project contains:
- IaC templates to automate enablement of both AWS and Partner services,
- Wrappers for most common formats like CfCT manifest,
- AWS Service Catalog baselines to allow customers to easily pick and choose from the services available.
For Pilot, we will focus only on including CfCT manifest file in the package.
- Project Owner : are users who can add contributors, change/approve permissions, and more.
- Project Contributor : Contributors are those that have been granted access to the project’s code repository.
- Repository permissions : GitHub permissions assigned to repo contributors. There are READ and WRITE permissions.
- Contributors with READ permissions need to fork the project, work on their fork and submit a PR. They will not be able to create a branch on the main repo, or run functional tests, or merge PRs.
- Contributors with WRITE permissions can read and make changes to the project. They can create branches in the main repo, run functional tests, and merge PRs.
- An external (non-Amazon) contributor will only have READ permissions.
Partner and Customer Workflows
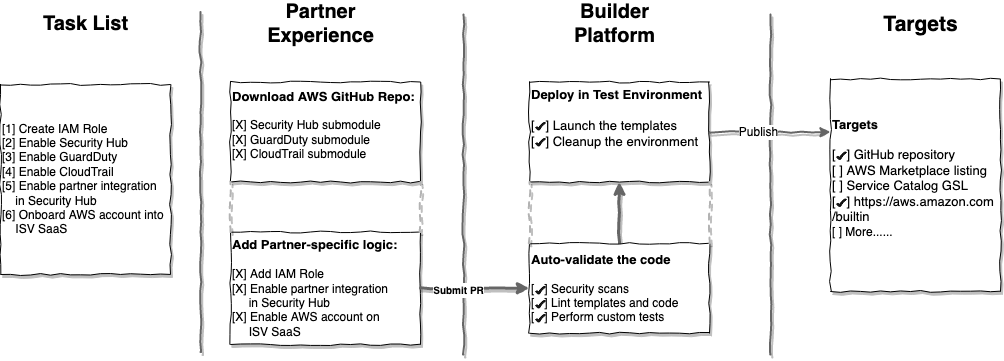
Partner Workflow
AWS provides modules to enable AWS foundational services based on AWS Security Reference Architecture (AWS SRA) guidelines.
Partners can pick these modules and add additional logic to perform remaining steps like enabling partner integration in Security Hub or registering AWS account to partner product.
Once the solution is built, the partner can submit a Git Pull Request (PR) to the repository created for this project.
All the PRs will go through a set of auto validations built-in to the pipelines. On successful completion of validation, the code is merged to the main branch of the repository, and published.
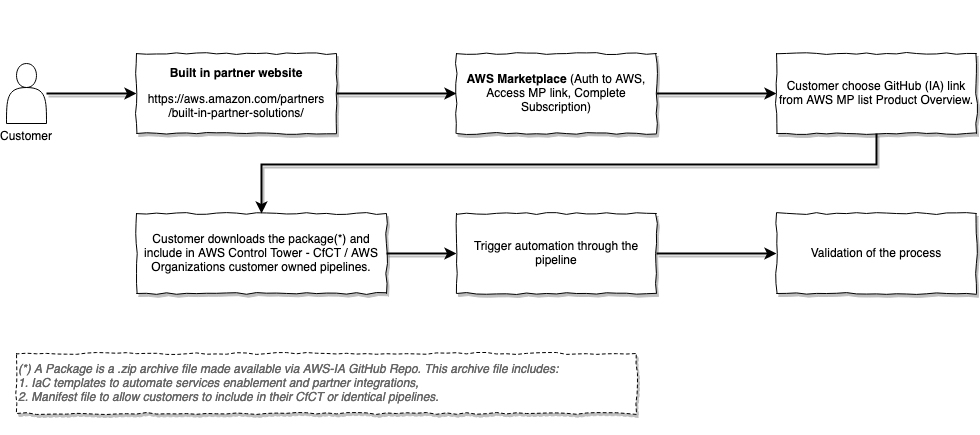
Customer workflow
Terminologies
- ABI : AWS Built In (ABI) as explained above.
- ABI Modules : The GitHub repositories based of AWS SRA (https://docs.aws.amazon.com/prescriptive-guidance/latest/security-reference-architecture/welcome.html), which provide templates for enabling AWS foundational services like CloudTrail, GuardDuty, and SecurityHub.
- ABI Projects : The GitHub repositories built by Partners in partnership with AWS. While building these projects, partners leverage ABI Modules provided to enable AWS services as needed before creating partner specific assets. The project contains 1\ IaC templates to automate enablement of both AWS and Partner services, 2\ Wrappers for most common formats like CfCT manifest, SC Baselines and more to allow customers to easily pick and choose from the services available. For Pilot, we will focus only on including CfCT manifest file in the package.
- Project : This is a GitHub repository for both ABI modules and ABI Projects
- Project Owner : The aliases of the 2‑5 Amazonians that will be granted administrative privileges to your AWS Builder Platform project.
- Project Contributor : Contributors are those that have been granted access to the project’s code repository.
- Repository permissions : GitHub permissions assigned to repo contributors (Read/Write). All external users will have Read permissions only.
Next: Choose Cost and licenses to get started.
Cost and licenses
cost
AWS service cost
In addition to the cost, consider costs associated with the AWS services you choose and the scale of your operations.
AWS services such as CloudTrail, Lambda, CloudFormation, S3, and AWS Key Management Service (AWS KMS) may have associated costs.
Other costs
Partner license
A license is required to use . Refer to the cost table earlier in this guide for pricing details.
ABI license
There is no additional charge for using AWS built-in. You will be only charged for the resources that an ABI consumes.
Next: See the Architecture section for an overview of the ABI solution’s architecture and its integration with various AWS services.
Test Framework - Architecture
When you submit a Pull Request (PR), a set of automatic tests and manual validations are performed.
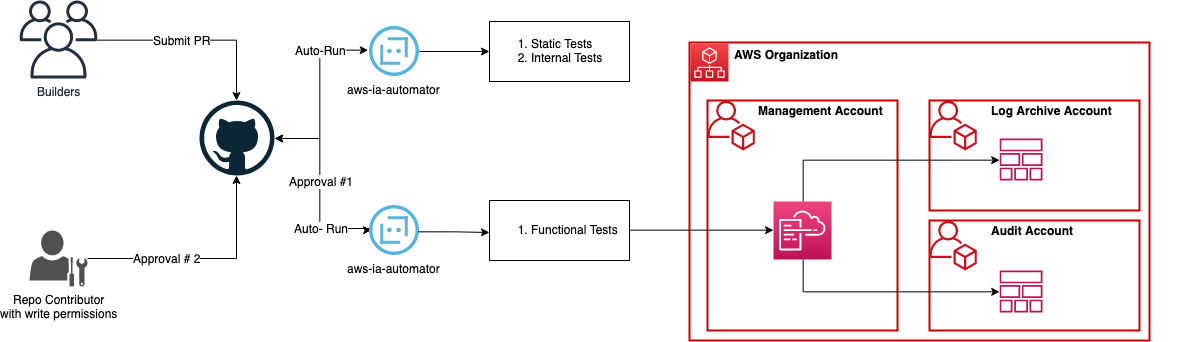
Below are the series of events that happen when you submit a PR:
- Internal tests are executed. These tests are built and maintained by the Infrastructure and Automation team at AWS. These tests look for common security vulnerabilities and other common security issues.
- Static tests are executed. The static tests include lint checkers, and scan templates/code provided against a set of pre- and custom defined security rules to identify potential vulnerabilities. Tools used are listed in the How to build an ABI project section.
PS: Any errors on the Internal and Static tests will be reported as comments on the PR. You need to choose
Details to view execution information.
- Human verification of the code by assigned AWS Partner Solutions Architects (PSA) team.
- Functional tests on successful completion of static tests and manual review, AWS PSA(^) kickoff functional tests by commenting
/do-e2e-tests in the PR. The functional tests, deploy the templates in the multi-account AWS environment associated with this repository. Tools used are listed below.
- Bot Approval will be provided on successful completion of both static and functional tests.
- Human Approval. AWS PSA(^) assigned to this project will review the test results of the functional tests and other security scanners and provide approval.
- AWS PSA(^) will Merge the branch to the
main branch once the above steps are cleared.
- Unless a partner opts-out, the Publish step will publish the code automatically to the targets configured for each project. If you do not want the repositories to be made public, reach out to your AWS PSA to opt-out.
(^) with write permissions to the repository
ABI Project Structure
When a project proposal is approved AWS Built-in team will create following resources before you get started with the project.
- GitHub repository
- Permissions to the repository for nominated contributors.
- A Test environment with 3 AWS accounts dedicated for this project.
If you are an AWS Partner, you need to work with an AWS PSA assgined for this project for any questions or issues.
PS: Only AWS PSAs will have access to the test environment and the accounts.
The internal and static test failures are reported in the GitHub console and contributors can review the logs from there. However, for functional tests, only the test status is reported. If you need to review the logs for troubleshooting purposes, you need to work with the AWS PSA assigned for this project.
When a project repository is created, it will be bootstrapped with the following files and folders:
.
├── CODEOWNERS
├── CODE_OF_CONDUCT.md
├── LICENSE
├── NOTICE.txt
├── VERSION
├── .taskcat.yml ## FILE TO DEFINE TEST CASES. USED BY THE TEST FRAMEWORK
├── lambda_functions
│   └── source ## FOLDER TO STORE LAMBDA FUNCTIONS
│   │   └── enable_integrations
│   │     ├── my_custom_function.py
│   │     └── requirements.txt ## FILE TO DEFINE DEPENDENCIES. USED DURING CREATION OF LAMBDA PACKAGE
│   └── packages ## THIS FOLDER AND CONTENT IS CREATED BY BUILD PROCESS. DO NOT CREATE.
│       └── enable_integrations
│         └── lambda.zip
├── scripts ## CLEANUP UTILITIES, USED BY THE TEST FRAMEWORK
│   ├── cleanup_config.json
│   ├── cleanup_config.py
├── submodules
│   └── aws-security-reference-architecture-examples
│       ├── AWS-SRA-KEY-INFO.md
│       ├── CHANGELOG.md
│       ├── LICENSE
│       ├── README.md
│       ├── aws_sra_examples
│       │   ├── docs
│       │   ├── easy_setup
│       │   ├── modules
│       │   │   ├── cloudtrail-org-module
│       │   │   ├── guardduty-org-module
│       │   │   └── securityhub-org-module
│       │   ├── quick_setup
│       │   ├── solutions
│       │   └── utils
│       └── pyproject.toml
└── templates  ## FOLDER TO STORE INFRASTRUCTURE AS CODE TEMPLATES
    ├── abi-enable-partner1-securityhub-integration.yaml
    └── enable_integrations
        └── partner1-enable-integrations.yaml
Architecture
Deploying this ABI with default parameters builds the following architecture.

As shown in the diagram, the Quick Start sets up the following:
-
In all current and AWS accounts in your AWS organization:
- to <detect changes in AWS Config configuration items (CIs)> and .
- to perform and .
-
In the management account:
-
In the log archive account:
-
In the security tooling account:
Architecture overview
The integration establishes a connection between and your AWS environment. uses IAM roles and policies to access and collect security-related data from your AWS accounts.
The deployment of the is automated using AWS CloudFormation. CloudFormation templates are used to provision the required resources, including IAM roles, S3 buckets,[….], and [….].
collects [….] from various AWS services, such as , , and . These events are processed and analyzed by ’s to provide additional capabilities like [….].
Based on the information collected, provides [….] to improve [….] of your AWS environment. These findings help you perform [….].
Next: See Deployment options to get started.
How to build an ABI project
The below example refers to steps followed to create the sample ABI project in this repository. While building your project, update the steps below as per your project needs.
-
Once you have access to the repository, fork the repository. Example below to create a fork from CLI.
gh auth login
gh repo fork https://github.com/aws-ia/cfn-abi-aws-reference-guide.git
Note: If you are working on a repository created for you, replace cfn-abi-aws-reference-guide.git with the your-repository-name.git. |
-
Add the required ABI Modules as submodules to your repository (The securityhub repo is used as a submodule in the below example.).
mkdir submodules
cd submodules
git submodule add https://github.com/aws-samples/aws-security-reference-architecture-examples.git
# SKIP below step, if you are working on `your-repository-name.git`. This will update the submodules recursively for an existing repository.
git submodule update --init --recursive
Check here for List of available ABI Modules.
-
Build and update the code as per your project needs. Follow the structure explained in the Project Structure section to organize your code. Below is an example of the directory structure for the sample ABI project in this repository:
.
├── CODEOWNERS
├── CODE_OF_CONDUCT.md
├── LICENSE
├── NOTICE.txt
├── README.md
├── VERSION
├── guide
│   ├── assets
│   ├── config
│   ├── content
│   │   ├── _index.md
│   │   │   ...
│   │   │   ...
│   │   └── overview.md
│   │   ...
│   ├── resources
│   └── static
├── images
│   └── abi-architecture.png
├── lambda_functions
│   └── source
│       └── enable_integrations
│           ├── cfnresponse.py
│           ├── copy_zips.py
│           ├── enable_integration.py
│           └── requirements.txt
├── scripts
│   ├── cleanup_config.json
│   └── cleanup_config.py
├── submodules
│   └── aws-security-reference-architecture-examples
│       ├── AWS-SRA-KEY-INFO.md
│       ├── CHANGELOG.md
│       ├── LICENSE
│       ├── README.md
│       ├── aws_sra_examples
│       │   ├── docs
│       │   ├── easy_setup
│       │   ├── modules
│       │   │   ├── cloudtrail-org-module
│       │   │   ├── guardduty-org-module
│       │   │   └── securityhub-org-module
│       │   ├── quick_setup
│       │   ├── solutions
│       │   └── utils
│       └── pyproject.toml
└── templates
    ├── abi-enable-partner1-securityhub-integration.yaml
    └── enable_integrations
        └── partner1-enable-integrations.yaml
Note: There is no need to package your lambda source. Taskcat will take care of it and upload it in the path of lambda_functions/packages/<directory-name/lambda.zip>. Please make references to your code as needed. |
Note: If you are using your-own-repository, files in the above structure will vary slightly. However, the directory structure remains same. |
-
Run static tests locally.
Execute the following tests locally in your environment, the same set of tests are executed as part of the pipeline validations done with these tests:
pip3 install cfn-lint
find templates -name *.yaml -o -name *.yml -o -name *.json | xargs cfn-lint
pip3 install taskcat
-
- Update the .taskcat.yaml in the root of the project as needed. Refer to example in next step or the taskcat documentation for additional information.
-
taskcat lint
-
Run functional tests locally
- automated-security-helper (ASH) tests (this performs
cfn_nag as well)
## Executing ash tool

$ git clone https://github.com/aws-samples/automated-security-helper.git /tmp/ash

# Set the repo path in your shell for easier access
$ export PATH=$PATH:/tmp/ash

$ ash --source-dir .
$ cat aggregated_results.txt
| Note: ASH tool is not part of the automated pipeline yet. If you are seeing this note, please include the output of the ASH tool file to your PR. |
- Run
taskcat tests to deploy the templates
- Update the .taskcat.yaml in the root of the project. Refer to taskcat documentation for additional information.
- Update the default .taskcat.yaml file to closest to the below example:
project:
name: cfn-abi-aws-reference-guide # Change this to your project name
owner: aws-built-in-team@amazon.com # Change to the owner
package_lambda: true # Use this if you have lambda code in the repos
shorten_stack_name: true # Recommended to use smaller stack names
s3_regional_buckets: false # Not required if CopyZips are used. Refer to any ABI module for examples.
regions:
- us-east-1

tests:
launch-partner-solution:
    regions:
    - us-east-1  # Control Tower Home region for Pilot
    template: abi-enable-partner1-securityhub-integration.yaml
    parameters:
    pSRASourceS3BucketName: $[taskcat_autobucket]
    pSRASourceS3BucketNamePrefix: $[taskcat_project_name]
    pSRAS3BucketRegion: us-east-1  # Bucket region. Keep it to us-east-1 as all the resources are deployed in the region.
    # ApiKey: $[taskcat_ssm_/path/to/ssm/parameter], update `taskcat_ssm_/path/to/ssm/parameter` as needed (^^).
(^^) WARNING: Do not include secrets like API Keys and Passwords in the parameters section of .taskcat.yml file. Refer to PSUEDO_PARAMETERS. Work with your AWS contact to securely make them available in the test environments. |
-
On successful completion of both static and functional tests in your local environment, publish the Pull Request(PR).
git add <file-name>
git commit -m <commit description>
git push
-
Create a Pull Request from your fork.
PS: Wait until both internal and static tests complete, as shown below.
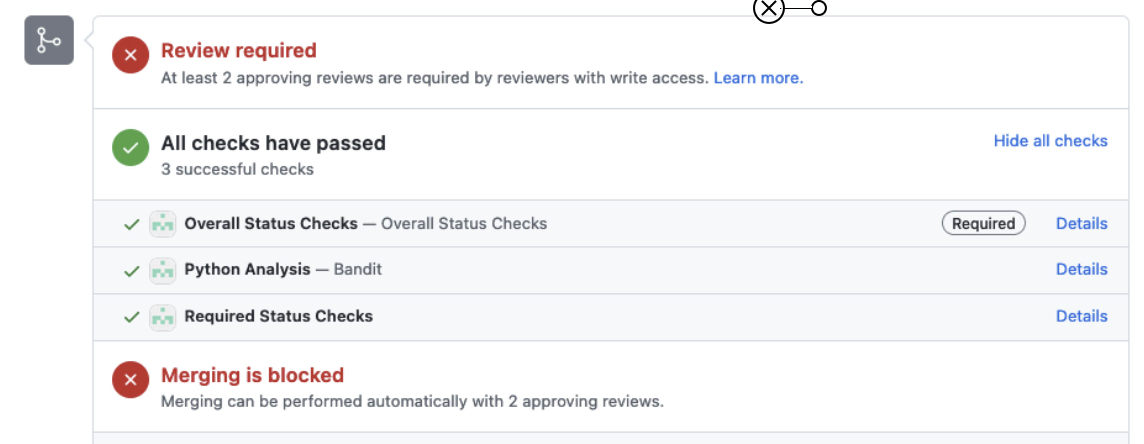
| NOTE: In case of test failure, choose Details to collect additional information |
-
Work with AWS PSA(^) to trigger functional tests. This can be done by adding /do-e2e-tests in the comments of the PR.
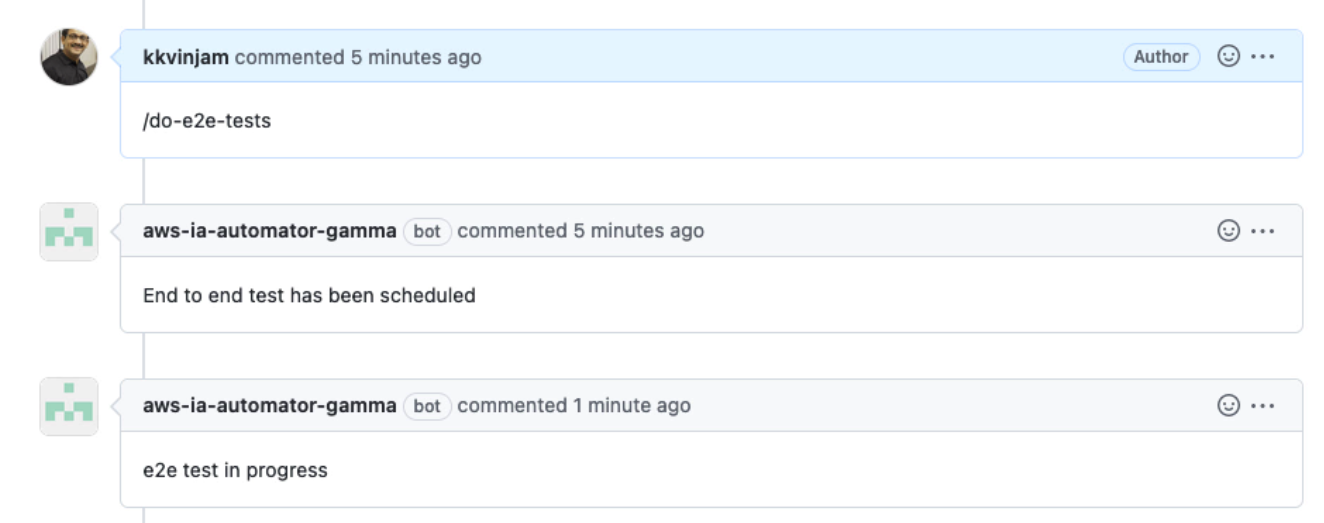
-
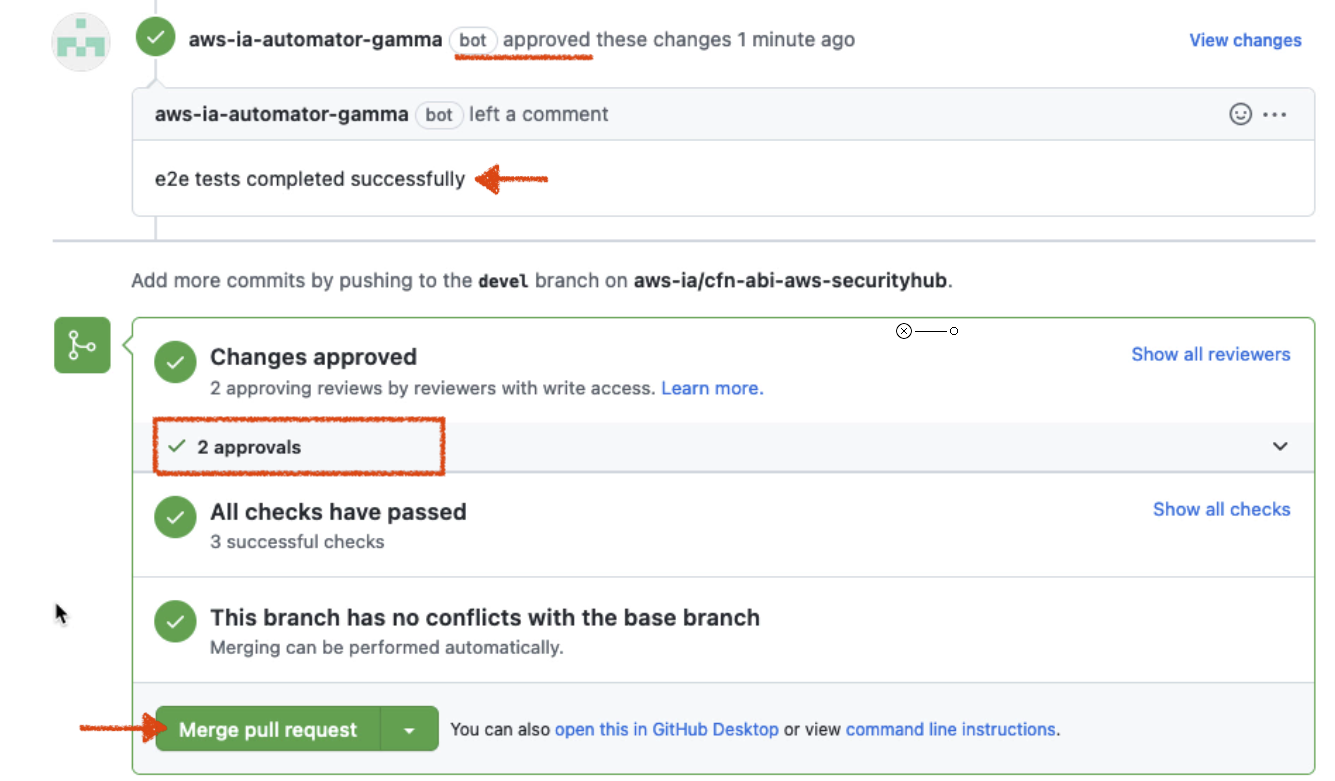
On successful completion of functional tests, the bot will add an approval. If the functional test fails, you will see an error, and you need to work with AWS PSA to get additional information on the failure.
| E2E tests have completed successfully, however I am unable to provide an approval, as I opened this pr. You will need an additional human to review. |
-
A second approval needs to be given by an AWS personal. Once you have 2 approvals, work with AWS PSA(^) to Merge the pull request.
| NOTE: Always sync your fork to get the latest code and build your solution on top of it. |
(^) with write permissions to the repository
Deployment Options
We learned from our customers operating in multi-account environments that they often have a customized deployment methods to manage their Infrastructure as Code (IaC) templates. They want to apply the same methodologies for entire infrastructure including AWS services, on-permises, or Partner products.
As part of AWS Built-in, we build the least possible denominator that can be used with multiple deployment options. Following are a few commonly used deployment options, we support in the current release:
- Launch using CloudFormation Template in the Management Account.
- Launch using Customizations for Control Tower (CfCT).
While we try to provide as many options as possible, we understand that we may not be able to cover all the deployment options. We are working on adding more deployment options based on the feedback. If you have a specific deployment option that you would like to see, please reach out to your AWS contact or open an issue in this GitHub repository.
Launch the CloudFormation template provided as part /templates/ in the Management Account of the organization.
- Login to your Management Account to deploy this ABI package.
- Choose Launch Stack and change the AWS Region to your AWS Control Tower home region.
Note: If you are NOT using AWS Control Tower in the environment where your are launching this solution, fill-in following parameters:
- pControlTower:
false
- pGovernedRegions:
us-east-1,us-west-1 (comma separated list of regions)
- pSecurityAccountId:
XXXXXXXXXXXX (AWS Account Id of the Security/Audit Account)
- pLogArchiveAccountId:
XXXXXXXXXXXX (AWS Account Id of the Log Archive Account)
-
Choose Next.
-
Type value to ARN of partner integration to turn on in AWS Security Hub: arn:aws:securityhub:$[taskcat_current_region]::product/cloud-custodian/cloud-custodian and leave the remaining values default.
-
Choose both the Capabilities and select Submit to launch the stack.
[] I acknowledge that AWS CloudFormation might create IAM resources with custom names.
[] I acknowledge that AWS CloudFormation might require the following capability: CAPABILITY_AUTO_EXPAND
Wait for the CloudFormation status to change to CREATE_COMPLETE state.
Launch ABI using Customizations for Control Tower (CfCT)
Customizations for AWS Control Tower combines AWS Control Tower and other highly-available, trusted AWS services to help customers more quickly set up a secure, multi-account AWS environment using AWS best practices. You can easily add customizations to your AWS Control Tower landing zone using an AWS CloudFormation template and service control policies (SCPs). You can deploy the custom template and policies to individual accounts and organizational units (OUs) within your organization. It also integrates with AWS Control Tower lifecycle events to ensure that resource deployments stay in sync with your landing zone. For example, when a new account is created using the AWS Control Tower account factory, Customizations for AWS Control Tower ensures that all resources attached to the account’s OUs will be automatically deployed.
The templates provided as part of the ABI packages are deployable using Customizations for Control Tower. Please check below for additional details.
Pre-requisites
- The CfCT solution, do not have ability to launch resources on the Management account. Hence, you need to create the role with required permissions in the Management account.
How it works
To deploy this sample partner integration page using CfCT solution, add the following blurb to the manifest.yaml file from your CfCT solution and update the account/ou names as needed.
resources:
  - name: sra-enable-partner1-solution
    resource_file: https://aws-abi.s3.us-east-1.amazonaws.com/cfn-abi-aws-reference-guide/templates/abi-enable-partner1-securityhub-integration.yaml
    deploy_method: stack_set
    parameters:
      - parameter_key: pProductArn
        parameter_value: arn:aws:securityhub:us-east-1::product/cloud-custodian/cloud-custodian
      - parameter_key: pSRASourceS3BucketName
        parameter_value: aws-abi
      - parameter_key: pSRAStagingS3KeyPrefix
        parameter_value: cfn-abi-aws-reference-guide
    deployment_targets:
      accounts:
        - [[MANAGEMENT-AWS-ACCOUNT-ID]]
Next: Choose Things to know.
Predeployment steps
Before deploying this ABI solution, complete the following steps:
- Subscribe to partner product from AWS Marketplace using
- Any things to be done before deployment
- Any other pre-deployment steps
- Become familiar with the additional resources, later in this guide.
Next: Choose Deployment steps to get started.
Deployment Steps
-
Download the Cloudformation template from the following location: https://
-
Launch CloudFormation template in your AWS Control Tower home region.
- Stack name:
template-<partner-name>-enable-integrations
- List parameters with [default values and update below example as needed]
- EnableIntegrationsStackName:
template-<partner-name>-enable-integrations
- EnableIntegrationsStackRegion:
us-east-1
- EnableIntegrationsStackSetAdminRoleName:
AWSCloudFormationStackSetAdministrationRole
- EnableIntegrationsStackSetExecutionRoleName:
AWSCloudFormationStackSetExecutionRole
- EnableIntegrationsStackSetExecutionRoleArn:
arn:aws:iam::<account-id>:role/AWSCloudFormationStackSetExecutionRole
-
Select both the Capabilities and choose Submit to launch the stack.
[] I acknowledge that AWS CloudFormation might create IAM resources with custom names.
[] I acknowledge that AWS CloudFormation might require the following capability: CAPABILITY_AUTO_EXPAND
Wait for the CloudFormation status to change to CREATE_COMPLETE state.
Launch using Customizations for Control Tower
Customizations for AWS Control Tower (CfCT) combines AWS Control Tower and other AWS services to help you set up an AWS environment. You can deploy the templates provided with the ABI solution using CfCT.
The templates provided as part of the ABI solution are deployable using Customizations for Control Tower. Please check below for additional details.
Pre-requisites
- The CfCT solution, do not have ability to launch resources on the Management account. Hence, you need to create the role with required permissions in the Management account.
How it works
To deploy the sample partner integration page using CfCT solution, add the following blurb to the manifest.yaml file from your CfCT solution and then update the account and organizational unit (OU) names as needed.
resources:
  - name: sra-enable-partner1-solution
    resource_file: https://aws-abi-pilot.s3.us-east-1.amazonaws.com/cfn-abi-aws-reference-guide/templates/abi-enable-partner1-securityhub-integration.yaml
    deploy_method: stack_set
    parameters:
      - parameter_key: pProductArn
        parameter_value: arn:aws:securityhub:us-east-1::product/cloud-custodian/cloud-custodian
      - parameter_key: pSRASourceS3BucketName
        parameter_value: aws-abi-pilot
      - parameter_key: pSRAStagingS3KeyPrefix
        parameter_value: cfn-abi-aws-reference-guide
    deployment_targets:
      accounts:
        - [[MANAGEMENT-AWS-ACCOUNT-ID]]
Partner specific steps [UPDATE AS NEEDED]
After the stack deployment is complete, verfiy following resources [….]:
Open and navigate to and perform following steps:
-
-
Next: Go to Postdeployment steps to verify the deployment.
Things to know
This section provides information on things that you need to know about AWS Built-in before you start building. Expect this section to get updated constantly as we learn more about the requirements from our customers and partners.
The following steps are applicable for both partners and customers. Partners who are building the solution should follow guidelines when deploying an ABI package in any AWS environment. In addition, include these in the repository documentation.
-
[Updated Dec 2023] For the current release, the existing modules are expected to operate only in AWS Control Tower environments. The modules provided as part of ABI package should be deployed only in the Management Account (within the Home Region of AWS Control Tower when it is used).
-
Follow the instructions in this link to enable trusted access for AWS CloudFormation StackSets with AWS Organizations via AWS CloudFormation StackSets console.
The guidelines below don’t apply to customers; they only apply to the partners who are building the solution.
-
Granting write permissions to GitHub repository is disabled for external contributors (non-AWS builders). This is required by AWS Security. Hence, the external contributors will not be able to create branches or merge the code to the main branch. Instead, fork the repo and submit the PR. Work with your AWS PSA contact to get additional support if needed.
-
The GitHub repositories remain private until completion of the initial release. The GitHub IDs need to added manually to get access to the repository. Work with your AWS PSA contact to get access to the repository.
List of available ABI / SRA modules
Next: Choose Common Patterns.
Common patterns
This section calls out some of the common patterns (including technical code samples) that are used in multiple partner solutions. This will be updated as we learn more about the requirements from our customers and partners.
CloudTrail ABI Module - Common Patterns
In this section, we will look at some of the common usage patterns that can be used to build the ABI projects. This is not a replacement for the ABI CloudTrail Module documentation available with the module. This is just a quick reference to help you get started with the ABI CloudTrail Module.
The CloudTrail ABI module, allows you to create an Organization CloudTrail within the Organization Management Account that is encrypted with a Customer Managed KMS Key managed in the Audit Account and logs delivered to the Log Archive Account. An Organization CloudTrail logs all events for all AWS accounts in the AWS Organization.
When you create an organization trail, a trail with the name that you give it will be created in every AWS account that belongs to your organization. Users with CloudTrail permissions in member accounts will be able to see this trail when they log into the AWS CloudTrail console from their AWS accounts, or when they run AWS CLI commands such as describe-trail.
The solution default configuration deploys an Organization CloudTrail enabling data events ONLY to avoid duplicating the existing AWS Control Tower CloudTrail, which has the management events enabled.
You can optionally enable management events ONLY for the Organization CloudTrail by setting the pEnableDataEventsOnly parameter to False. See below for common patterns.
Pattern 1: Enable Organization CloudTrail with management events only
The following template snippet is the minimum parameter required to enable Organization CloudTrail with management events only. You may leave the remaining parameters to default values.
  rCloudTrailManagementEventsOnly:
    Type: 'AWS::CloudFormation::Stack'
    Properties:
      TemplateURL: !Sub >-
        https://${pSRASourceS3BucketName}.s3.${pSRAS3BucketRegion}.${AWS::URLSuffix}/${pSRAStagingS3KeyPrefix}/submodules/aws-security-reference-architecture-examples/aws_sra_examples/modules/cloudtrail-org-module/templates/sra-cloudtrail-org-module-main.yaml
      Parameters:
        pEnableDataEventsOnly: 'false'
        pSRASourceS3BucketName: !Ref pSRASourceS3BucketName
        pSRAS3BucketRegion: !Ref pSRAS3BucketRegion
        pSRAStagingS3KeyPrefix: !Ref pSRAStagingS3KeyPrefix
Pattern 2: Enable Organization CloudTrail with data events only
The following template snippet is the minimum parameter required to enable Organization CloudTrail with data events only. You may leave the remaining parameters to default values.
  rCloudTrailDataEventsOnly:
    Type: 'AWS::CloudFormation::Stack'
    Properties:
      TemplateURL: !Sub >-
        https://${pSRASourceS3BucketName}.s3.${pSRAS3BucketRegion}.${AWS::URLSuffix}/${pSRAStagingS3KeyPrefix}/submodules/aws-security-reference-architecture-examples/aws_sra_examples/modules/cloudtrail-org-module/templates/sra-cloudtrail-org-module-main.yaml
      Parameters:
        pEnableDataEventsOnly: 'true'
        pSRASourceS3BucketName: !Ref pSRASourceS3BucketName
        pSRAS3BucketRegion: !Ref pSRAS3BucketRegion
        pSRAStagingS3KeyPrefix: !Ref pSRAStagingS3KeyPrefix
Scenario 1 : For partner integrations that leverage ABI CloudTrail module
We recommend providing an option in your main template to enable the CloudTrail module. Keep this option disabled by default. Considering the cost associated with CloudTrail when a second trail is created unintentionally, we recommend having this option disabled by default and let customers choose to enable this option.
This allows the customers who do not have the CloudTrail trails enabled, to enable it as part of the deployment of your solution.
The following template snippet provides a sample of achieving it.
Metadata:
  AWS::CloudFormation::Interface:
    ParameterGroups:
      - Label:
          default: CloudTrail Module Properties
        Parameters:
          - pEnableCloudTrail
          - pEnableS3DataEvents

    ParameterLabels:
      pEnableCloudTrail:
        default: Enable CloudTrail Organization Trail?
      pEnableS3DataEvents:
        default: Enable CloudTrail S3 Data Events for all buckets or management accounts?

Parameters:
  pEnableCloudTrail:
    AllowedValues: ['true', 'false']
    Default: 'false'
    Description: Enable CloudTrail
    Type: String
  pEnableS3DataEvents:
    AllowedValues: ['true', 'false']
    Default: 'false'
    Description: Enable CloudTrail S3 Data Events for all buckets
    Type: String

Conditions:
  cEnableCloudTrail: !Equals [!Ref pEnableCloudTrail, 'true']


Resources:
  rCloudTrailEnableInOrg:
    Type: 'AWS::CloudFormation::Stack'
    Condition: cEnableCloudTrail
    DeletionPolicy: Delete
    UpdateReplacePolicy: Delete
    Properties:
      TemplateURL: !Sub https://${pSRASourceS3BucketName}.s3.${pSRAS3BucketRegion}.${AWS::URLSuffix}/${pSRAStagingS3KeyPrefix}/submodules/aws-security-reference-architecture-examples/aws_sra_examples/modules/cloudtrail-org-module/templates/sra-cloudtrail-org-module-main.yaml
      Parameters:
        pSRASourceS3BucketName: aws-abi
        pSRAStagingS3KeyPrefix: cfn-abi-aws-cloudtrail
        pEnableS3DataEvents: !Ref pEnableS3DataEvents
      Tags:
        - Key: sra-solution
          Value: !Ref pSRAStagingS3KeyPrefix
GuardDuty ABI Module - Common Patterns
In this section, we will look at some of the common usage patterns that can be used to build the ABI projects. This is not a replacement for the ABI GuardDuty Module documentation available with the module. This is just a quick reference to help you get started with the ABI GuardDuty Module.
The sample code provided in the GuardDuty module accomplishes the following:
-
Enables GuardDuty for all AWS accounts that are current members of the target organization in AWS Organizations
-
Turns on the Auto-Enable feature in GuardDuty, which automatically enables GuardDuty for any accounts that are added to the target organization in the future
-
Allows you to select the Regions where you want to enable GuardDuty
-
Uses the organization’s Audit account as the GuardDuty delegated administrator
-
Creates an Amazon Simple Storage Service (Amazon S3) bucket in the logging account and configures GuardDuty to publish the aggregated findings from all accounts in this bucket
-
Assigns a life-cycle policy that transitions findings from the S3 bucket to Amazon S3 Glacier Flexible Retrieval storage after 365 days, by default
-
Enables GuardDuty S3 protection and EKS protection, by default
NOTE-1: If the solution is deployed outside us-east-1 region, there are few additional steps required. Please refer to the Installation workflow documentation from the ABI GuardDuty Module for more details.
NOTE-2: There is a known issue with the GuardDuty module, when pAutoEnableMalwareProtection is set to true. Please leave this option to false until the issue is resolved. We will update this document once the issue is resolved.
For partner integrations that leverage ABI GuardDuty module
The following template snippet is the minimum parameter required to enable GuardDuty. You may leave the remaining parameters to default values, unless your product needs additional options supported by the ABI module. Please refer to the Descriptions of each parameter in the template for additional details.
We recommend providing an option in your main template to enable the GuardDuty module. Keep this option disabled by default. If the customer already has GuardDuty enabled in their environments, trying to enable GuardDuty again will lead to stack failures.
This allows the customers who do not have the GuardDuty trails enabled at organization level, to enable it as part of the deployment of your solution.
The following template snippet provides a sample of achieving it.
Metadata:
  AWS::CloudFormation::Interface:
    ParameterGroups:
      - Label:
          default: GuardDuty Module Properties
        Parameters:
          - pEnableGuardDuty
          - pAutoEnableS3Logs
          - pAutoEnableKubernetesAuditLogs
          - pAutoEnableMalwareProtection
    ParameterLabels:
      pEnableGuardDuty:
        default: Enable GuarDuty at Organization level
      pAutoEnableS3Logs:
        default: Auto Enable S3 Logs
      pAutoEnableKubernetesAuditLogs:
        default: Auto Enable kubernetes Logs
      pAutoEnableMalwareProtection:
        default: Auto Enable malware protection

Parameters:
  pEnableGuardDuty:
    AllowedValues: ['true', 'false']
    Default: 'false'
    Description: Enable GuardDuty at Organization level
    Type: String
  pAutoEnableS3Logs:
    AllowedValues:
      - 'true'
      - 'false'
    Default: 'true'
    Description: Auto enable S3 logs
    Type: String
  pAutoEnableKubernetesAuditLogs:
    AllowedValues:
      - 'true'
      - 'false'
    Default: 'false'
    Description: Auto Enable kubernetes Logs
    Type: String
  pAutoEnableMalwareProtection:
    AllowedValues:
      - 'true'
      - 'false'
    Default: 'false'
    Description: Auto Enable malware protection
    Type: String

Conditions:
  cEnableGuardDuty: !Equals [!Ref pEnableGuardDuty, 'true']

Resources:
  rGuardDutyEnableInOrg:
    Type: 'AWS::CloudFormation::Stack'
    Condition: cEnableGuardDuty
    DeletionPolicy: Delete
    UpdateReplacePolicy: Delete
    Properties:
      TemplateURL: !Sub https://${pSRASourceS3BucketName}.s3.${pSRAS3BucketRegion}.${AWS::URLSuffix}/${pSRAStagingS3KeyPrefix}/submodules/aws-security-reference-architecture-examples/aws_sra_examples/modules/guarduty-org-module/templates/sra-guardduty-org-module-main.yaml
      Parameters:
        pAutoEnableS3Logs: !Ref pAutoEnableS3Logs
        pAutoEnableKubernetesAuditLogs: !Ref pAutoEnableKubernetesAuditLogs
        pAutoEnableMalwareProtection: !Ref pAutoEnableMalwareProtection
        pSRASolutionName: !Ref pSRASolutionName
Next: Choose FAQs.
Postdeployment options
Verifying the solution functionality
After successfully deploying the , verify that the solution is working as expected. Perform the following steps:
Parnter capability 1
Parnter capability 2
Next: See Test the deployment to validate the solution’s functionality.
FAQs
Can I contribute to this repository?
Yes, this shared under Apache License, version 2.0 (the “License”). Please submit a GitHub issue if you see an issues or improvements. If you like to build and contribute a fix or enhancement, please submit a GitHub pull request with your changes.
All pull requests will go through auto validations and human reviews before it is merged.
How to add internal AWS contributors?
Access to the repositories are controlled from the builder platform interface.
How to add contributors from partner side?
Use the same mechanism mentioned above to manage access to the repository. If you are a partner trying to access these repos, reach out your assigned AWS PSA.
How do I add secrets to the parameters in the taskcat file?
Our preferred way is to pass the parameter as SSM_Parameter value and pass it as $[taskcat_ssm_/path/to/ssm/parameter] as a value. While testing locally, make sure to create the parameter in your account/region that you are testing. When you check-in the code, reach out to your AWS contact to facilate this setup in your test environment.
A: Please make sure you have docker running in your local environment before executing ash tool. There were issues reported with podman, please use docker while we investigate the issue.
Test the deployment
Step-1
Step-2
Step-3
Next: See Additional resources to explore more documentation and references.
Additional resources
Partner documentation
AWS Services
Frequently asked questions (FAQs)
Other documentation
Next: See Troubleshooting for common issues related to the .
Troubleshooting
For troubleshooting common ABI issues, refer to the AWS Built In General Information Guide and Troubleshooting CloudFormation.
Next: See Feedback to provide feedback on ABI deployment or report issues encountered during the deployment process.
Notices
This document is provided for informational purposes only. It represents current AWS product offerings and practices as of the date of issue of this document, which are subject to change without notice. Customers are responsible for making their own independent assessment of the information in this document and any use of AWS products or services, each of which is provided “as is” without warranty of any kind, whether expressed or implied. This document does not create any warranties, representations, contractual commitments, conditions, or assurances from AWS, its affiliates, suppliers, or licensors. The responsibilities and liabilities of AWS to its customers are controlled by AWS agreements, and this document is not part of, nor does it modify, any agreement between AWS and its customers.
The software included with this paper is licensed under the Apache License, version 2.0 (the “License”). You may not use this file except in compliance with the License. A copy of the License is located at http://aws.amazon.com/apache2.0/ or in the accompanying “license” file. This code is distributed on an “as is” basis, without warranties or conditions of any kind, either expressed or implied. Refer to the License for specific language governing permissions and limitations.
Feedback
To submit feature ideas and report bugs, use the Issues section of the [GitHub repository. To submit code, refer to the AWS Built-in Reference Guide. To submit documentation feedback, use the following GitHub links:
Next: Choose Notices.
Cleanup Instructions
Cleanup Instructions